| The MountPoint | Photo Album | Chuck | The Bus | CFI |  |
|
 1968 Cessna 177 Cardinal N3212T

|
| Topics N3212T's Site: | N3212T | Weight & Balance | Documentation | Flight Aware |
| Topics on this Page: | Water Leaks | Wing Root Fairings | Door Seals |
|
Water Leaks
It had been raining most of the day, and for several days prior, when I decided to go take a short hop to St. Augustine to see the avionics shop about a small problem I was having with the audio panel. When I opened the pilot's door I noticed that there was water all over the floor. My first thought was that I didn't close the door tight enough, but after a quick inspection I also noticed that the head liner was also soaked. It was apparent that the wing root fairings were leaking. I had seen water in the plane before, but it was mostly in the baggage compartment after I had given the Cardinal a bath. Most Cardinals leak a bit, and I have been sprinkled on when flying through clouds or rain, but I had never seen water like this in the passenger compartment. Something had to be done, and while I'm at it, I might as well replace the aging door seals.
| |
|
| |
|
Wing Root Fairings
I had read a few articles on the CFO web site about how to stop leaks in the wing root and the common wisdom was to use greased felt or sill seal instead of the green putty that Cessna originally used. At the annual, the shop used the green putty method, and it was obviously not working as well as I wanted. I decided to try the sill seal simply because it was cleaner and I could get the sill seal at my local Home Depot. I also picked up some contact cement to tack the sill seal to the wing root fairing so that it would stay put when I was putting the fairing in place.
| |


| |
|
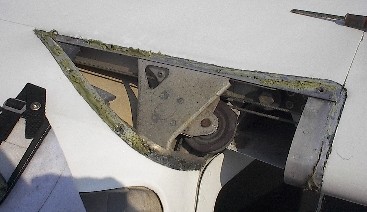
The first step was to remove the fairing, and as you can see green putty was
clearly not sealing the top of the fairing and that is where the water was
coming in when I tested it. Interestingly, the fairing itself had the green
putty all across the top. I guess it just wasn't sealing well.
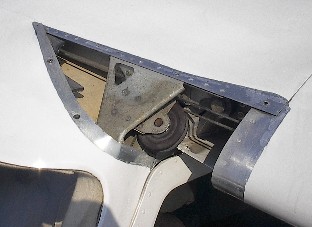
Next I had to thoroughly clean the area of all the green putty and the black crud that was once green putty and never cleaned up. This is by far the most time consuming and dirty part of the job. | |
|
Finally the fairing and wing were clean and I could add the sill seal. The
articles that I read had pictures of another sill seal installation with pink
sill seal. I was lucky in that I found white sill seal at Home Depot.
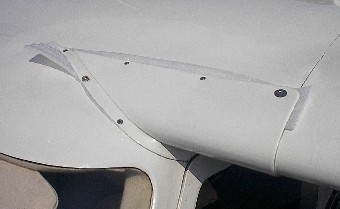
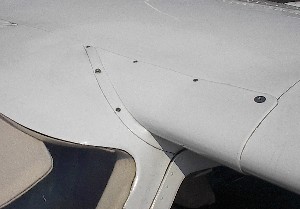
I tacked it to the wing root fairing with a small amount of contact cement and let it overlap a bit to make sure that it was sealing everything properly. I then attached the fairings to the wing and took a razor blade and cleaned up the edges. It looked pretty good, but I wanted to make sure it was keeping the water out, so I headed to the wash rack to blast it with water. I blasted the fairing from all sides with water and the only leak I found was again in the baggage compartment. I've got to get those sealed. | |
|
| |
|
| |
|
Baggage Door Seals
Being that for the first two and a half years that I owned the plane it was kept tied down outside, whenever it would rain, the carpet in the baggage compartment would get soaked from water coming in from the baggage door area. The seals looked like they were original, so I decided that they needed to be replaced. I purchased a universal seal that I thought would be good for that door. When it arrived, I realized that it was a lot bigger than I had thought, but it did fit the area so I decided to continue and install the seal as planned. First I remove the old seal, by simply pulling it off. Removing the seal was relatively easy but the old rubber essentially crumbled when it was removed. I cleaned the door to make sure that all the old seal was gone then followed that up with an alcohol rub down to make sure there was no grease that would prevent the new seal from sticking to the door. After measuring and fitting the new seal, I cut out the area around the door latch. That would be the seal begin and end point when it was installed. Next I re-cleaned the door and seal with alcohol and applied aluminum safe contact cement to the seal and door. After the cement set up for 5 minutes, I started carefully attaching the seal to the door. Once the glue on the seal and door touch, itís there for good, so you need to be very careful and precise when it is attached. When the seal was completely attached, I closed and locked the baggage door and didnít open it for24 hours so that the glue could cure. The seal works great, although because of the size of the seal, it was initially more difficult to close the door. After a few months it was no problem at all. Since changing the seal, I havenít had any water in the baggage compartment. | |
|
| |
|
|


