| The MountPoint | Photo Album | Chuck | The Bus | CFI |  |
|
 1968 Cessna 177 Cardinal N3212T

|
| Topics N3212T's Site: | N3212T | Weight & Balance | Documentation | Flight Aware |
| Topics on this Page: | First Annual | Squawk Sheet | Surprise! | Pictures | Reflections |
|
The First Annual
OK, so it wasn't the first annual. When I bought the plane I had an annual done by a Cessna Service Center. There were a lot of things that I now think they should have caught, like a leaking fuel selector switch. Perhaps they knew that I wouldn't be back since they were in Connecticut and I was in Florida. Southeast Aero Services is another story. I had them do the initial panel rework shortly after I brought the plane home and was impresses with their professionalism. I chose them to do my REAL first annual because the service manager, Brian Wood, was familiar with Cardinals, and because he came highly recommended. I also decided that there were some safety issues that although they were legal, and some would say perfectly fine, I wanted them addressed. So I had new four point front seat belts from BAS installed. I also had a PowerFlow exhaust installed because of the anemic climb performance and the aging issues of the original exhaust. In addition to replacing the old rusted exhaust, the PowerFlow will help me get to a safe altitude more quickly. There were lots of other little things, and some not so little, that needed to be corrected. I decided that I was going to have all of my squawks fixed, no matter how small. | |
|
| |
|
The Squawk Sheet
The squawks were stuff that I wanted taken care of during the annual. Some were issues that I discovered in the last year, and others were things that I wanted upgraded for safety or other issues. This is the stuff that I knew about. Nose gear steering rod - When I was making a tight left turn on the ground I was hearing a popping sound, like something was sticking. Unfortunately for me, it was the nose gear steering rod that was worn out and slightly bent on the end. It had to be replaced. Cessna wanted more than $5000 for it, but I didn't need the gold plated version. I found it from another supplier for only $2700. Engine baffling - The baffling was obviously the original 1967 vintage, and it was brittle and not helping the engine cooling situation at all. It had to go if I wanted to keep the engine in good shape. Cowl Mounts - Some of the cowl mounts were coming apart, so new ones needed to be ordered. Comm Antenna - One of the communications antennas appeared to be original, the fiber glass was showing, and the radio it was connected to was much weaker than the other. After speaking with the avionics shop, we decided that it should be replaced. Flaps Lagging - The Flaps were taking more time to come than they should. In a go-around situation, the lag would cause the flaps to retract entirely and not stop at the 1/4 setting when that was selected. Ducting - The fresh air and defrost ducting under the panel and above in the wing also appeared to be original and crumbling. I decided that it also needed to be replaced. Air Vents - The air vents on the co-pilot side, both front and back, would not open or close no matter what I did. That had to be corrected. As it turns out, the problem ended up being a mud dauber nest about the size of a softball that was stopping the vents from opening and closing. CorrosionX - Several of my friends suggested that, being in Florida, I needed to periodically do a corrosion treatment to stop and prevent an corrosion from building up. I figured now is as good a time as any. JP Instruments EDM 700 Engine Monitor - I initially thought I had 2 EGT probes, although the switch on the indicator was a 4 position switch, and one of those probes failed. I found out that I had 4 probes and all 4 needed to be replaced. I thought about getting rid of the switch and replacing the instrument with a 4 in 1 instrument. All told that would have cost me more than $600, so I decided to go with an EDM 700 engine monitor. It would be twice the price, but a major improvement in engine monitoring capability. PowerFlow Exhaust - The exhaust system was original 1967 and getting to the point where it needed to be replaced. I decided to replace it with a PowerFlow exhaust. It would give me a lot better climb and all over engine performance. Challenger Air Filter - Since the air filter has to be replaced at the annual, I decided to replace the Bracket air filter with a performance filter from Challenger Aviation Products. BAS Seat Belts - When I bought the plane, it had only lap belts in front, and that was unacceptable. I decided to replace the front belts with BAS internal reel four point seat belts. The came highly recommended. Nulites Instrument Lighting - I really like to fly at night. Perhaps that's one of the reasons I fly more in the winter. If N3212T has had any weaknesses at night, its the instrument lighting. So, I said that during this annual I was going to have some sort of instrument lighting installed to make the gauges easier to read at night. I found Nulites in a magazine and decided to give them a try. | |
|
| |
|
Surprise!
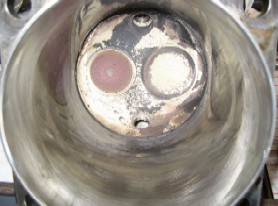
The day after Southeast Aero Services started working on the annual inspection, I got a call from Brian. The first words out of his mouth were, "Are you sitting down?" My heart fell into my stomach, and my stomach fell on the floor. One of the first things on the to-do list were to change the oil and check the cylinder compressions. At the annual I had done when I bought the plane, the cylinder compressions were 73/80 on all cylinders. The log book reads "Compression 73/80 all cylinders. Bore scoped for condition." I had asked for the bore scope because the engine had been flown for only 50 hours in the past 8 years, an average of little more than 6 hours a year.
The cylinders came off and went to Don George Aircraft Engines to be re-honed. The good part of this story is that there appears to be no corrosion on the crank shaft or cam, and the pistons and piston pins are in excellent shape, just as you would expect on a 150 hour engine. The other good thing about this is that the anemic climb performance that I was thinking was just a characteristic of the Cardinal with the 150HP engine, was partially due to the fact that I had much reduced power. The fixed cylinders and the addition of the PowerFlow exhaust are going to make this bird really fly! So, what are the lesson learned? First, when you get a pre-buy/annual inspection done before you buy a plane, know that the shop will do a good job. Get references! Buying a plane that is a long way away is tough. Don't assume that just because it is a factory service center that they will do a good job. Get references! Second, after you get the plane home, go to a shop that you KNOW will do a thorough job and get a second look. Make sure they look at the safety of flight things, and expect to pay for a really good set of eyes. And if you need a reference, Southeast Aero Services is an expensive shop, but in my opinion, it is the best in northeast Florida. One final surprise was in store for me on the break-in flight. Brian Wood and I began the flight in the normal way. Set the instrument to current settings, altimeter, attitude indicator, directional gyro, all set. Check the magnetos, 100 RPM drop on each, perfect. Check the instruments, fuel pressure, oil pressure, vacuum pressure, oil temperature, amps, all good. So we took off into the clear and a million day and within the first 2 minutes after takeoff we had a total vacuum failure. We finished the break-in flight, 2 hours as prescribed by Lycoming, with no additional problems. Southeast Aero checked the pump and sure enough, it failed. They replaced it with a new pump and all was well. | |
|
| |
|
Pictures
| |
 Its a sad sight to see an an engine with less than 200 hours on it in this shape, but
what are you going to do? The good thing is that when it was all said and done, I have
a lot more power to work with.
As it turns out, the power increase was incredible. My takeoffs use a lot less runway, and I get more than twice the vertical speed in the climb. My only regret is that I really don't have a reference to how much the Powerflow exhaust is increasing those numbers. Really all that matters is that its a new plane. | |
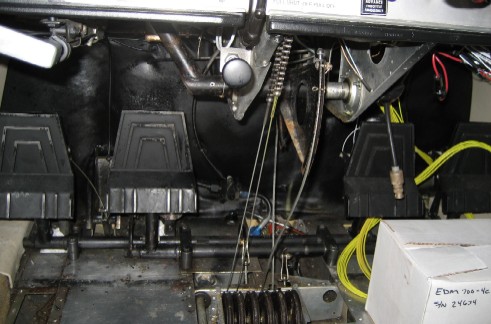 Under the instrument panel you can see everything. They had to replace the nose
gear steering rod, which is accessible from here. You can also see the wires from
the EDM700 engine analyzer being installed. You can also see slack in the cable that
goes to the stabalator. It had to be removed to check for cracks mentioned in a
service bulletin from Cessna.
I also had to replace the brake calipers because the retaining bolts were corroded and really worn. After those were installed I flush and replaced the brake fluid. The right side went really quickly. The left side seemed to take a lot of fluid, and as it turns out, was leaking from one of the flexible line fittings because it was cross threaded. I removed the master cylinder and the brake line, which took a long time because of how it is accessed back behind the rudder pedal. I then tapped the fittings and re-installed everything and it all worked nicely. All told, the brakes took me about 6 hours. | |
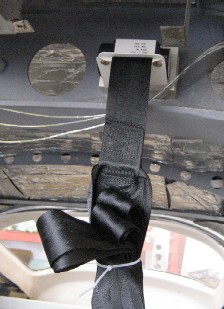 Here you can see the BAS seat belts that have been installed into the wing spar. It
will sure be nice to have the 4 point harness seat belts in the front. Unfortunately,
there didn't appear to be a place to mount a shoulder harness for the back seats. The
finished product looks really nice.
It was certainly nice to see the spar in such good shape. This was one of the potential gotcha's that the Cardinal Flyers Online warns you about when buying a cardinal. I had the shop in Connecticut check for spar corrosion, but after the other findings I wondered if they actually looked. In the case of N3212T, the spar is in great shape. We found no corrosion at all. One thing we did find was a vintage 1967 6X9 speaker. In the process of installing new vent hoses and adjusting the vent knobs, I broke the speaker. Believe it or not, a basic speaker is hard to find these days. Most are high fidelity speakers with massive magnets, and consequently wouldn't fit in the speaker slot. I finally found the smallest 6x9 speaker I could at Wal-Mart. It was installed with minor modifications to the speaker slot. | |
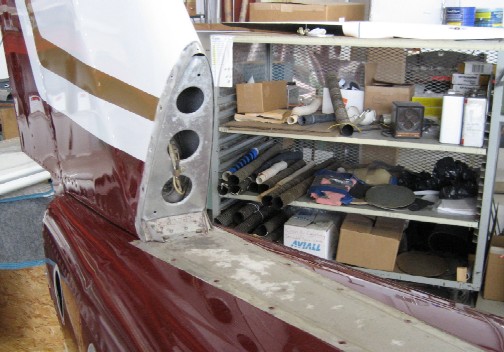 There is also a service bulletin out to check for cracks where the vertical stabilizer
is mounted to the empendage. In addition, the stabalator had to be removed to check
for those cracks as well. Luckily, there were none in either location. We did find
some surface corrosion on the top of the empendage under the stabilizer root fairing
that I removed with a scotchbrite pad and CorrosionX. Once the corrosion was taken
care of, the whole plane treated with CorrosionX to make sure it remains free of the
corrosion that we all love to hate.
The CorrosionX treatment will have to be done every few years, and now that I know how it is done, I can and will do it next time. | |
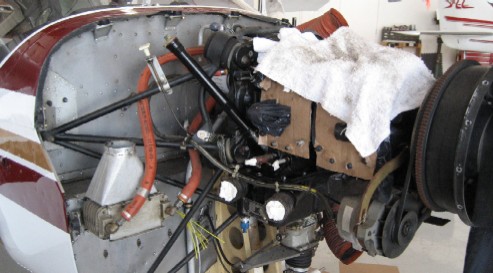
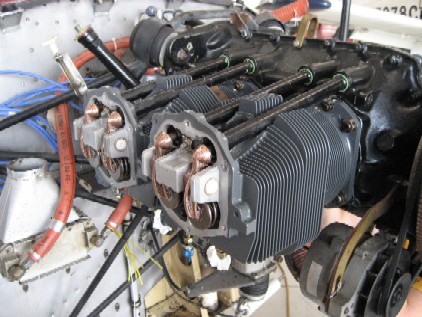 It was really nice to see the cylinders back on the case, and they look really nice
too. They were even painted to prevent surface corrosion.
Don George Aircraft Engines
rebuilt the cylinders to make sure everything was correct. Now, with the new
cylinders and the EDM-700 I can say with confidence how the engine is running and will
be able to detect small problems before they become big problems. In this picture you
can see the yellow wires from the EDM-700 that had yet to be wired up.
We also noticed that the alternator was at the stop on its bracket. As it turns out, the belt was the wrong size, so we had to remove the prop to get a new belt. I didn't really have a problem with that because the belt was 9 years old and showing its age. At this point, the last thing I needed was for the alternator belt to break. | |
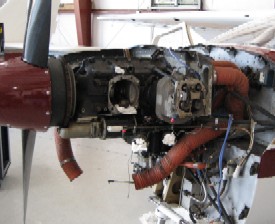
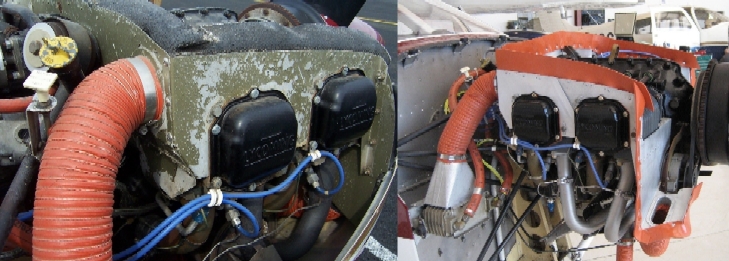 Here is the comparison of the engine when I bought the plane in March of 2006, and just
as the annual was finishing up. A huge difference, in my opinion. The engine
compartment is cleaner, and will certainly cool better with the new baffle seals in
place. With the JPI EDM-700 now installed, I'll know when something is going wrong
and be able to diagnose and correct the problem before it turns into a monster.
| |
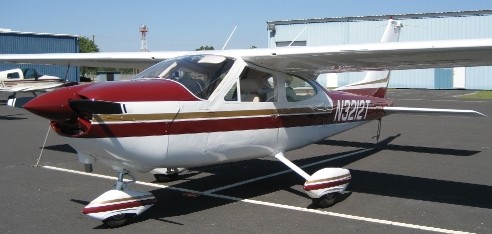 At first glance, nothing much changed on the outside. You can see the new comm
antenna on the top left, and you can see the shiny new PowerFlow exhaust. If you
look closely, you can see the new brake calipers. One outside improvement you can't
see in this picture is the pilot side tie down ring. It's now fixed and retracts into
the wing when not in use instead of just dangling there. The spring just needed to
be replaced. A minor thing, but an annoyance that I wanted to go away.
| |
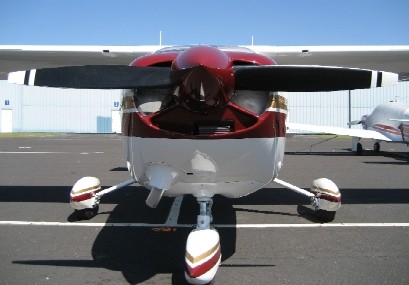 The front of the plane shows the new Challenger K&N performance air filter, the
PowerFlow short stack exhaust and a better view of the new brake calipers. The nice
thing about the K&N filter is that it can be cleaned and reused meaning that in the
long run it should be cheaper to maintain.
I replaced the brakes myself under Brian's supervision. I learned a lot about how the brakes work especially because of the leaking brake line near the master cylinder. I had to remove the master cylinder to get that fixed. It took me nearly an 6 hours, but I really learned a lot about how it all works and goes together. | |
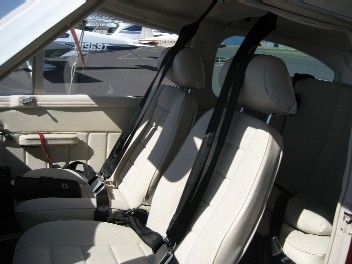 The seat belts look great and certainly are safer than the frayed lap belts that used
to be in the front seats. Unlike most 4 point harness systems, this one has only two
connection points. This makes it so there isn't a lot of trouble getting the shoulder
straps aligned in the buckle like with other systems. I only wish there was something
that I could do to get shoulder harnesses for the rear seats.
I also added head rests to the front seats. Although the seats didn't have them when I bought the plane, the original headrest holes were in the seat backs. The headrests were one of the cheapest things I had done at the annual. I got the headrests from a wrecked Toyota Celica and had them re-upholstered. All told, I paid less than $100 for both headrests, including the re-upholstering work. The headrests were one of the few things that my wife wanted, so I made sure I complied to that request. | |
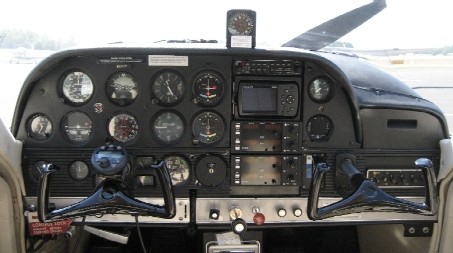 This view of the panel shows the new control wheels. Brian insisted on replacing the
originals, at no cost to me. When Southeast Aero installed the audio panel, they
drilled two small holes in the bottom of the yokes to attach a mounting bracket for
the push to talk switches. Brian said that this made the yokes not meet the type
certificate, so he wouldn't sign it off and of course I wouldn't pay for new yokes
since I didn't do anything to make them unairworthy. They look great and now have
the PTT switches in the left grip. They look and work great!
You can also see the JPI EDM-700 where the EGT gauge used to be and the new Standby Vacuum System warning indicator light. More difficult to see is the Standby Vacuum System pull knob down by the brake handle. If the vacuum goes out, just pull the knob for instant vacuum pressure. A pretty sweet and economical solution. | |
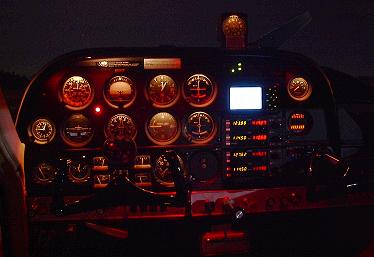 The one thing that didn't get done during the annual was the aircraft instrument
lighting. With all the other work being done, I just couldn't afford the estimated 20
hours and $1500 in labor to install the Nulites. Brian told me that this was one
thing that I could do myself, so under his supervision, I tried to install one of the
lights on the vacuum pressure gauge. Initially I was going to install them between
the panel and the plastic overlay, but it looked horrible. Since installing them
from the back seemed impossible, I decided to simply return them and look for a better
solution. However, the procrastinator in me got the better of me and by the time I
got around to calling Chief Aircraft, the easy return time had lapsed and they would
need a 15% re-stocking fee.
I decided to make a go at installing them no matter how difficult it would be or how much time it would take. I figured at 2 hours per instrument, I could have them installed on all the instruments by the time winter rolled around. I did a little more research and found that the aircraft owner can do the installation with no A&P sign-off needed as long as the instructions were followed and everything was done properly. All I needed to do was make the appropriate log entry in the aircraft log and I'd be good. Nulites even gives you a good logbook example to work from. Initially, as expected, they were not easy to install at all. The first instrument, the tachometer, took more than 2 hours to get wired up and I was a little frustrated with how it was going but decided to continue on. Once I learned a few tricks, the lights went in with no problem. All told I spent a about 4 evenings installing lights in the 13 round gauges and 4 square ones. I got it all done in about 9 hours and was extremely happy with the result. I figure I saved myself about $650 by doing it myself. It looks like a new plane at night, and WOW WHAT A DIFFERENCE! | |
|
| |
|
Reflections
| |
|
Going into my first real annual inspection, I knew I was going to pay more money than
a normal annual inspection. I wanted to make the plane as safe for my family as I
possibly could and I had a lot of minor things that I wanted fixed. Its a lot easier
to convince someone that your plane is safe if it looks good, is well maintained,
and everything works. That is what I wanted.
I certainly didn't expect the cylinders to be producing such low power, and assumed that the PowerFlow exhaust would bring me into the normal C172 power range that I had experienced in the other flying I had done before buying N3212T. When they failed the compression test miserably, the flight characteristics all of a sudden made sense. Although the exhaust needed to be replaced, the added performance of the PowerFlow was just icing on the cake. I've only flown the plane a few hours since it was returned to service, and I have already decided that I need to re-learn how to fly this plane. The EDM-700 is an enlightening instrument. I can now see the individual cylinder head temperatures and can adjust my climb speed to cool them down to a normal climb temperature. I have already noticed that I need to climb at a faster speed to keep the temps down, but with the increased (restored) power, I can still get more than 500 FPM in the climb even at climb speeds of over 100 miles per hour. I've also noticed that the same takeoff run that I used to take with 1/4 flaps can now be done with no flaps, and in about half the distance. And one other note, I have done a few go-arounds with the new engine and the plane takes off like a rocket. The sight picture out the front window was initially a little unsettling and has taken some getting used to. All in all, the 6 weeks N3212T was at Southeast Aero Services was a good thing for the plane and my family. I paid a lot of money but got everything fixed. Next year's annual should be a lot easier on the wallet, and take a lot less time. | |
|
| |
|
|

